So, you decided to gear up your website with WordPress? Congrats, half battle is won! Now you’re just a WordPress theme short of getting an eye-catching website designed and developed. A tempting WordPress theme can make your WordPress website attractive and user friendly.
Thankfully, designing a catchy website in WordPress is no rocket science. You can get the things done with just a bit coding knowledge. As a designer, you could be putting your heart and soul into designing some amazing web designs but you still need the proper programming skills to make those designs work on the web. So what can you do to convert your beautiful designs to fantastic web pages? This article will show you how by taking you through a simple 5 step crash course for converting your PSD templates to a WordPress theme.
PSD and WordPress themes are two terms that don’t need introduction in the world of web designing. PSD is basically a Photoshop Document created by Adobe Photoshop. It is a workable file that lets you save and edit parts of the image into separate jpeg or png files. This is the file where you can pour out all your creative abilities to create your custom designs. You can open a PSD file in Photoshop and carry out any editing operations any time.
Assuming that you’re new to WordPress themes, allow me to explain it in a simplest form to you. Consider WordPress themes similar to your smartphone themes. Just as a mobile theme decides the look and feel of your phone – the icons and the wallpaper, the navigation and the likes; a WordPress theme provides the basic visual identity to your website or blog.
A WordPress theme is basically a group of files, technically called as templates, which decide the basic look and feel of your website.
WordPress started out as an open source blogging platform and has grown into one of the most popular website creating tools that non-programmers are so thankful for. It lets you create your own blogs and simple websites without having to learn the complexities of web programming. It lets you add more functionality with its hundreds of readymade plugins that you can easily use. WordPress themes are one of the basic building blocks of a WordPress website. Themes are nothing but the design layout of the website that you create and it is also known as a template.
WordPress provides you with a range of prebuilt themes that you can easily include in your web pages. But what if you wanted to create your own custom design to make yourself unique? You need some way to transfer the design from a picture to a website. This conversion may sound complex but is quite easy if you follow the following 5 steps.
The craft of converting your PSD into a WordPress theme starts with cutting. You slice your PSD and divide it into separate image files so that each design component is effectively saved as a separate design file. You can make use of any photo editing software or more preferably Adobe Photoshop to slice your PSD files.
Make a mental note of what are all the things that you will need to load as an image in your web page. More web images mean slower web page. So try to optimize the images. Decide what needs to be static and what should be created dynamically.
An easy way to slice your PSD is to look for these components first.
And be careful when you slice your components. Even a single mismatch of pixels can make your final page look messy.
Now the next step is to reach to the programming world from the designing world. But it is going to be fairly simple. From the PSD design that you have crafted, create a static HTML and CSS template. It is better to name the files index.html and Style.css for future use.
There are several software packages like Dreamweaver and Fireworks that let you do this step very easily. But learning a little bit of HTML and CSS is not going to be a waste of time. So follow some basic tutorials you can find in sites like W3Schools, TutsPlus and developer communities to gear up for your web page designing.
Place your images and sliced up components into their right positions with the help of index.html and the corresponding CSS file. You can follow a responsive web design to make sure your site looks beautiful on all screens.
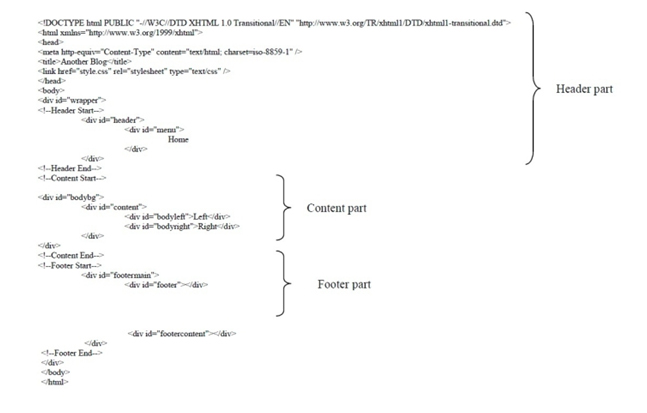
Let me show you a sample break up of code based on the div tag and CSS styling.
index.html
CSS and its sample output:
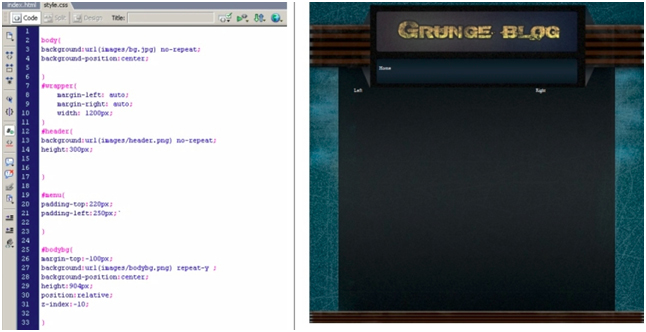
Here the footer, background, and header are sliced up from the original PSD.
Now you have the basic template ready and you need to port it to the WordPress environment. But before you do that you may require a little knowledge on how things are organised in WordPress.
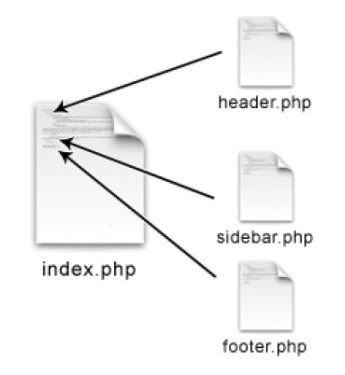
WordPress has a specific file structure that you need to follow. You are basically going to upload your web page to WordPress themes and WordPress software should work with it seamlessly so that the plugins and additional functionalities can be added without any hassle or incompatibility issues. So go by the WordPress standard file structure and break your index.html file accordingly into the necessary .php files.
Two major files that make up a WordPress theme are the index.php and the style.css files. Besides these, a typical WordPress theme consists of many PHP files for the basic features like header.php, archive.php, sidebar.php, footer.php and so on. So now it is your duty to carry out this kind of compartmentalisation of code and break up your index.html into the necessary feature .php files. Don’t worry if you find this task intimidating. There are so many free tutorials out there that can help you carry out this task like walking in a breeze.
Some pointers that may help you are listed down below.
style.css
The main stylesheet: This file must be attached to the Theme, and it will contain the header information of the theme.
rtl.css
The rtl stylesheet. This CSS file will be included automatically.
index.php
The main template file: It is the parent file of the template.
comments.php
This file defines the comments template.
front-page.php
The front page template: it is only used for a static front page.
home.php
The home page is the front page by default.
single.php
This file is used when a single post is queried. For this and all other query templates, index.php is used if the query template is not present.
page.php
This one is used for individual page templates.
category.php
This page is required to show the categories.
tag.php
This page is required when the tag is needed.
date.php
To display the date/ and time we need this template page.
archive.php
Used when a category, author, or date is queried. Note that this template will be overridden by category.php, author.php and date.php for their respective query types.
search.php
To perform a search we need this file inside the template.
attachment.php
To view a single attachment we require this file.
image.php
Image attachment template is used when viewing a single image attachment.
404.php
The 404 Not Found template is to display the error message when the post is not found.
You are almost done. All you have to do now is import the awesome inbuilt functionalities provided by WordPress into your theme files with the help of WordPress tags. Only after you add these tags, you can say that you have created a WordPress theme. Follow the given link to know the available WordPress template tags.
You can get the details of each tag and you know how best to use them in your .php files. And if you want to add some more functionalities follow the below link which lists down all the functionalities provided by WordPress.
Everything tag and functionality under these pages are explained in detail with sample usages. It should be fairly easy for you to catch on and create your own themes in no time.
Once you are done with adding the necessary tags and functions, you should place all the files into a single folder that goes by any name of your choice. This folder is then placed inside the ----/wp-content/themes/ folder that could be found in your WordPress installation. For example, if your WordPress is installed in a folder named WordPress-testing, the theme name is theme-test, your files will go to location WordPress-testing/wp-content/themes/theme-test/.
If you have done everything right, you should be able to activate your custom theme from your WordPress dashboard. There you go. Go flaunt your new cool WordPress website that has its unique custom design.
So with the last step, you have already successfully created your own custom WordPress theme from a PSD file. But there is always room for improvement and you should always keep improving. So add more functionalities to your theme as you keep learning more. Untap the magic of working with WordPress themes. If possible try learning some more exciting techs like JavaScript to add even exciting features to your theme.
The whole process of converting a PSD template into a WordPress theme is quite simpler. However, if the whole process seems to be too much mind-boggling (which is quiet normal for non-coders), you could choose to hire a WordPress developer. He is experienced, skilled and anytime possesses more knowledge regarding themes, its impact on your website’s performance and other stuff which might sound like rocket science to you.
Thank you for sharing this great tips on converting PSD into WordPress theme. I got a bit of idea that how this conversion is helpful for me and I would also recommend this blog to my colleagues also so that they can also know the benefits from this blog. Keep posting such useful blogs.
Thanks for making a stupendous guide, Jyoti. I’m trying to drop some creative to my site. Whilst I know a bit about PSD, WordPress is still a strange land to me. Guess I’ll hire a web developer to help me then.