Created by developer Vladimir Anokhin, the ShortCodes Ultimate WordPress Plugin is one of the most popular wordpress plugins, gaining a consistent rating of 5 stars and a staggering amount of 600 000 and counting active users. This elicits the question: Just what does this plugin do that makes it this welcome amongst wordpress users and how do you begin using it for yourself? Here’s what you need to know:
The ShortCodes Ultimate plugin is a WordPress plugin designed to facilitate wordpress users with an abundance of over 50 and counting shortcodes, thereby allowing them to perform a series of functions. WordPress users can easily turn their free wordpress themes into premium themes by retrieving premium theme features and displaying it on their website. With the plugin, business owners can choose to make use of customisation abilities and create different functions like tabs, buttons, custom widgets, sliders, boxes, input responsive videos, make use of custom CSS editors and more! What is even more delightful about the ShortCodes Ultimate Plugin is that it comes with RTL support and works well with multilingual sources. It can also work regardless of the user’s theme and remains fully responsive.

You can use this Plugin with D5 Creation Themes easily. This Plugin will add 50+ Extra features with D5 Creation Themes. You can find This Tutorial for more information. You can download, Install and Activate the Plugin from the ShortCodes Ultimate Plugin Page.
There are a number of ways one can apply the use of the ShortCodes Ultimate plugin.
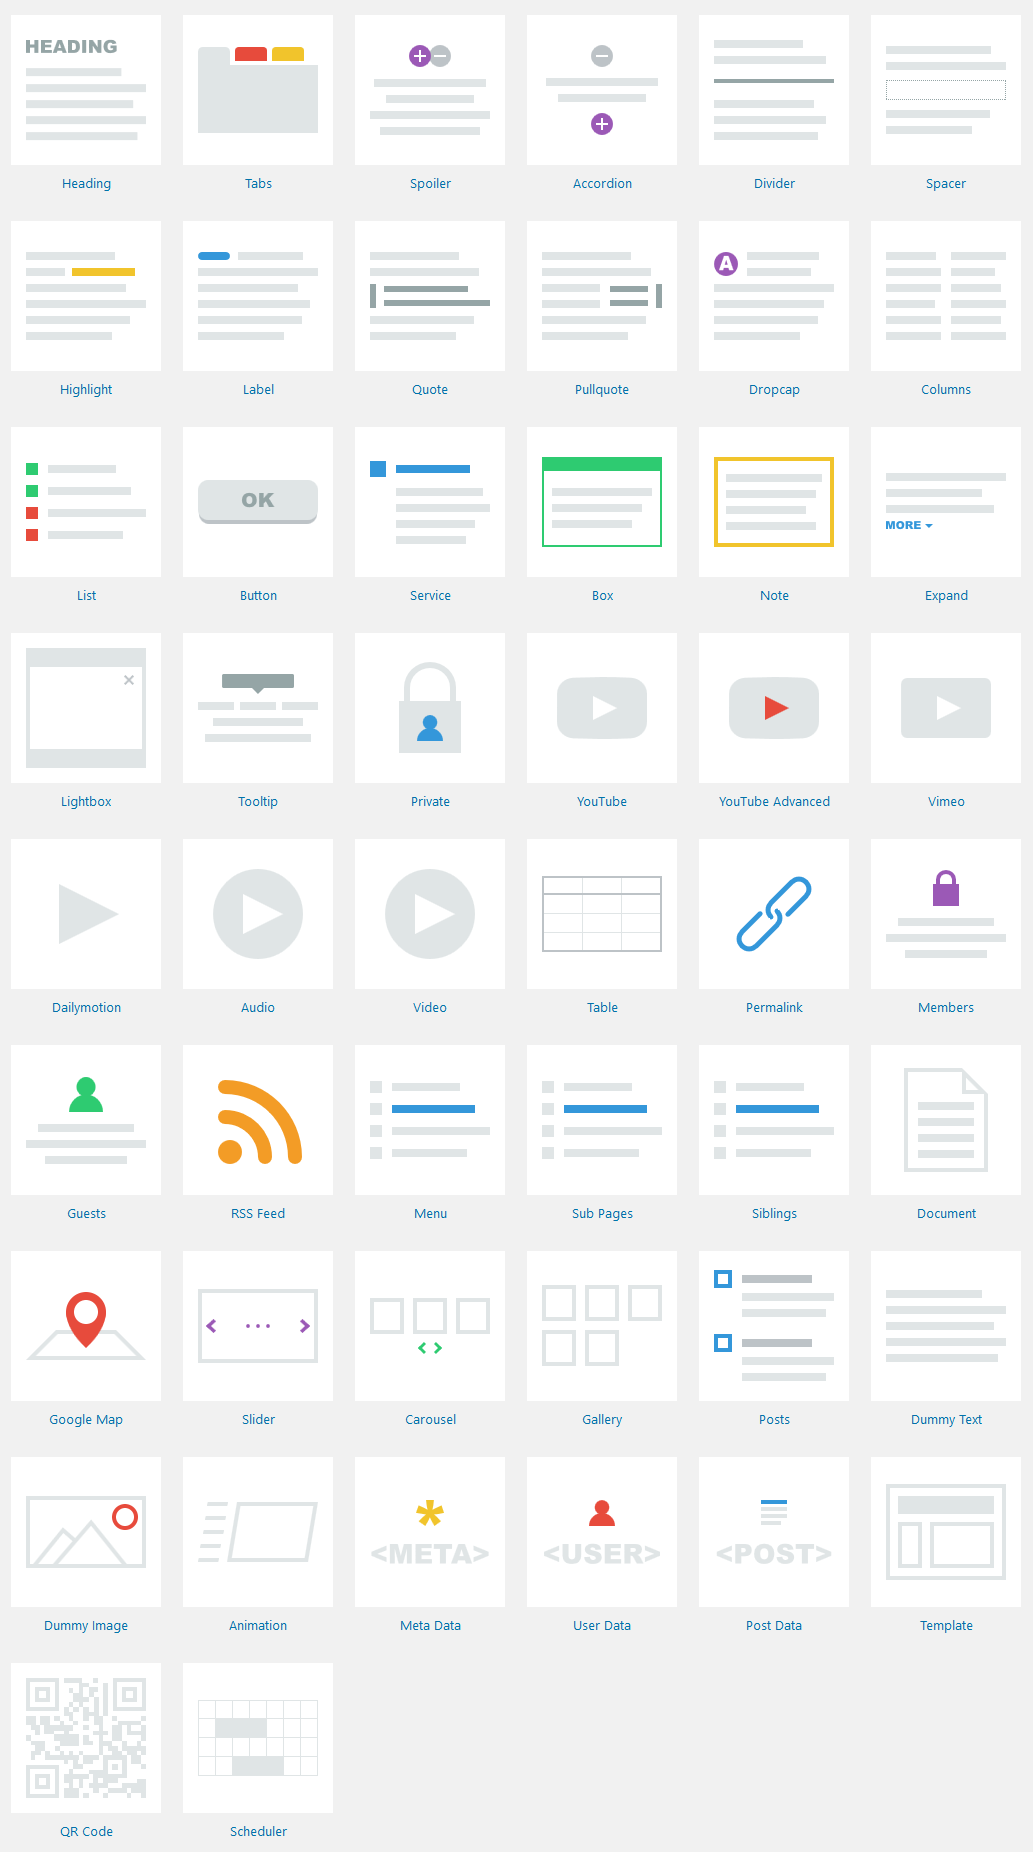
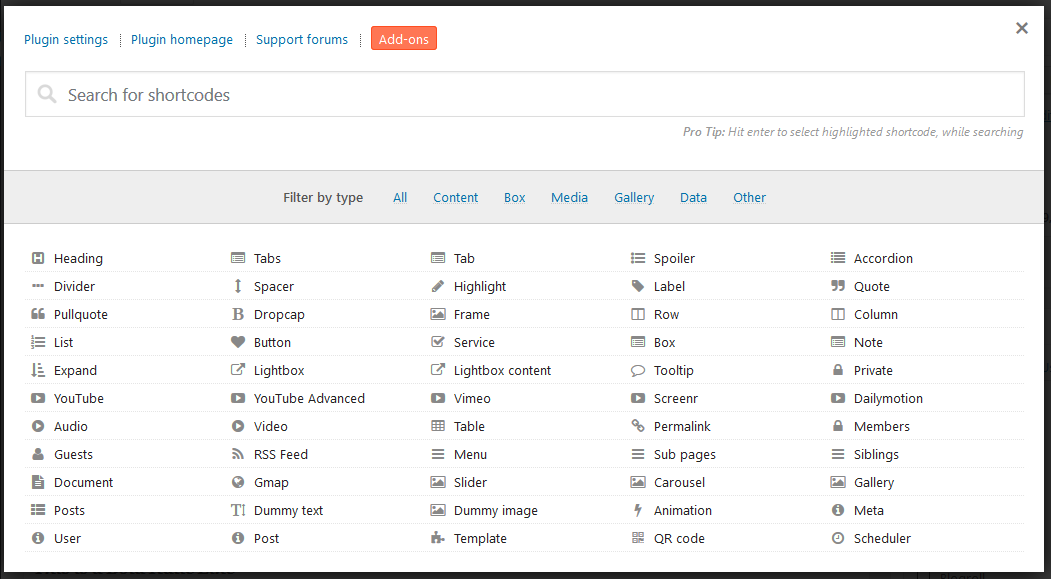
Upon installing and activating your ShortCodes Ultimate plugin, you will find that they come with 50 and counting ShortCodes that are categorised based on styling, content writing, content division, adding media files and other relevant categories. What is interesting to know is that each of these ShortCode features can be styled according to preference, with different styling options and live previews provided before the user follows through with adding them to the page or post.
To edit existing styles or create a custom CSS, locate your plugin and look under the Settings tab. You will then be able to access the custom ShortCode option. Once that has been selected, look for the Create Shortcodes function at the top of the page. Users will be prompted to come up with distinctive shortcode names as well as a slug (short name). To further clear up any confusion, you can make use of the shortcode description section to type a few words explaining what the custom shortcode does. As an option, there will also be a section for users to input default content. The default content is placed between open and close shortcode tags as a default through the shortcode generator.
Users can then move on to add attributes whenever necessary and make changes to the relevant fields. For example, if you have selected colour as your custom shortcode function, you will be prompted for the slug, default value, field type, attribute name and attribute description. You will then be able to choose to input the codes in either HTML format or the other available options. Once you have typed a code example, click on publish. This will successfully create your custom shortcodes.
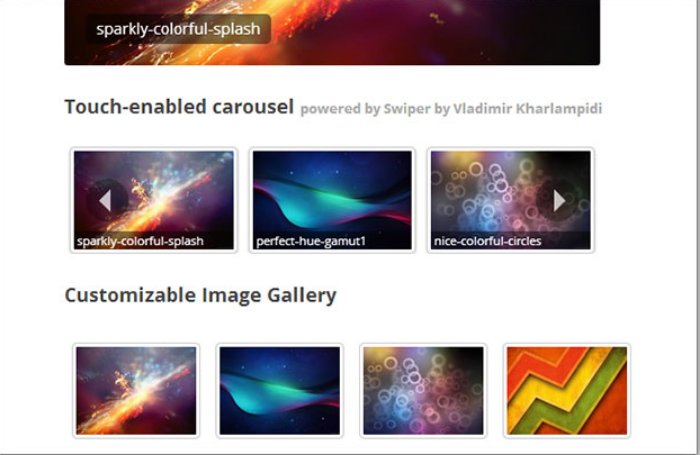
Locate the Insert ShortCodes option and select it so that you will be led to a category page. Choose Gallery as your option and select make a new gallery. Once you have done so, make sure to give your gallery a distinctive name you can properly identify it with and begin uploading the images you want to include in said gallery. Make sure that all your images are given titles and descriptions that are comprehensive as well. After which, save all the changes and reload your gallery so that it appears in the ShortCodes menu. For safety reasons, you can take the time to preview your image gallery. You will also be able to make customisations to whether you wish to show titles. If there are no further changes, simply select insert shortcode to create.
To try creating sliders, locate your post or start creating a new page complete with the image and media elements you want to include. Next, begin creating the shortcodes with the [ + ] option once more and choose the Nivo Slider option. Make the necessary changes and select insert once the changes have been complete. After which, publish the page and take a look at the effects. If you want to change the size, effect and other components, you can do so anytime by switching back to edit again.
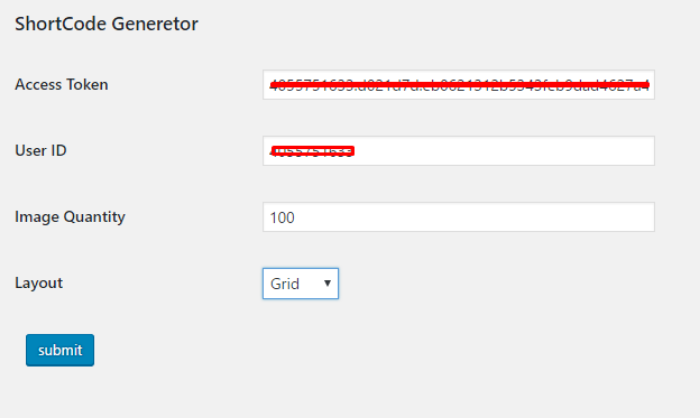
In the event that you wish to safeguard your wordpress website design, you can implement an access restriction so not everyone can make changes to your website with the ShortCodes Generator. To do so, add [ update_option(‘su_generator_access’, ________’); ] to the functions.php file in your theme. Keep in mind that you will have to replace the ___ feature with a role. Most business owners opt to use administrator since being an administrator is usually the minimal user role that can access the ShortCode generator. But you can also replace it with any other user roles whenever necessary.
To create special widgets using the ShortCodes Ultimate plugin, one can access the widget section by looking under the Appearance tab and choosing widgets as the beginning step. You will be able to see ShortCodes Ultimate displayed as one of the ‘Available Widgets’ after having accessed the Widgets Panel. Next, hold down the ShortCodes Ultimate selection, drag and drop it into the following options- your main sidebar, your showcase sidebars or your footer areas according to what you require. This will then open up a dialog box allowing you to specify the title and a larger panel for additional information. Hover over the [ + ] option and select it so that you will be able to select your desired shortcode.
For widgets, a button shortcode is usually recommended. This will open up options for you to create styled buttons with- you can change the colour, background style, corner radius and other related design factors. Once satisfied, click the insert option. This will instantly generate the shortcode for you based on your selected customisations, make sure to click save. You can then visit your wordpress website and take a look at the changes. Your special widget should have been created.
To begin creating, you will need to access your Categories section by first selecting the Posts option in the panel. Next, create a comprehensive name for it with the understanding that this will be what is displayed on your website. Make the relevant changes before selecting the add new category option. Once this is successful, you will notice your named category within the list presented to you. Select the edit option for your jCarousel creation and make use of the description to briefly state what it is before saving. Now open up your posts page and select a few before choosing the edit option. You will then be able to select the category option you needed. Next, create a post with the intention to make use of it for the shortcodes. Select the [+] symbol again so you can choose the shortcode type, which is the jCarousel option.
This will allow you to choose the image source, links and other carousel settings. Click OK once your changes have been created. Publish the page if there are no other material to add and take a look at your website changes that have been created!
ShortCodes Ultimate also supports the use of nested shortcodes, which essentially functions as the implementation of one shortcode within another. Users can make use of simple formats like:
[__]
[____] Whichever Text You desire [/___]
[__]
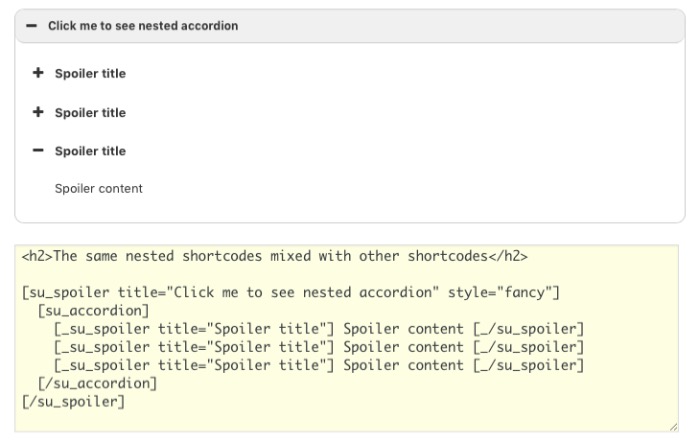
However, if one wants to use the same nested ShortCodes, one will require the use of underscores for each to prevent confusion. Once application is done, it will look similar to:
[____]
[_ button] Insert text You desire [_/button]
[/___]
By following this format, you should be able to successfully use nested Shortcodes with ease.
Users who wish to use the ShortCodes Ultimate plugin with another plugin or template can opt to do so by invoking it through the use of a wordpress function. Usually the do_shortcode function should suffice. Make use of [echo do_shortcode( ‘[_____]______[/___]’}; as the function format.
Do note that in order to be able to perform this task, you will need to install the ShortCodes Ultimate Skins Add On first. After doing so, you can begin by creating a new page in your WordPress website and opening the ShortCodes generator window. Locate your Pages section and select add new, then choose the insert shortcode option. You will then be able to choose the shortcode type accordingly and locate the style option for your new skins. For users who are unable to access them, clear the plugin cache by visiting plugin settings. Locate your WordPress dashboard and search for the ShortCodes plugin. Access the settings and clear the plugin cache from there.
Users can also choose to create their own custom ShortCodes with the help of the add ons. Once you have created custom ShortCodes, you can actually choose to import or export them as well. In order to do so, you will need to take access the WordPress Dashboard. Locate the tools option to be able to select either import or export. If you are exporting your custom ShortCodes, select the custom shortcodes option and download the exported file in xml format. If you are trying to import shortcodes that you have previously created however, make sure the files are also in xml format. Select the import option and choose WordPress so that you are able to upload your files. If the process is unsuccessful, you may need to consider installing the Importer Plugin as an alternative option.

In the event that something occurs, there are some troubleshooting steps one can undertake to maintain their plugin. For users looking to disable updates or revert to an older version of ShortCodes Ultimate, you will be required to download nonupdate editions of ShortCodes Ultimate and install/activate them within your WordPress website. To look for nonupdate editions, simply access the developer page and look for resources provided.
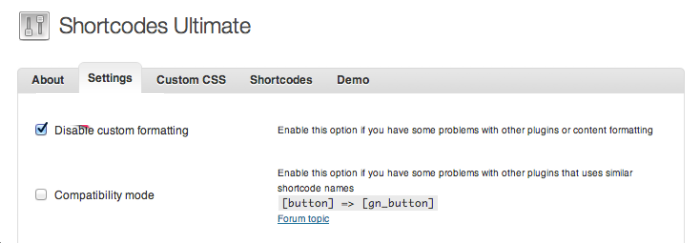
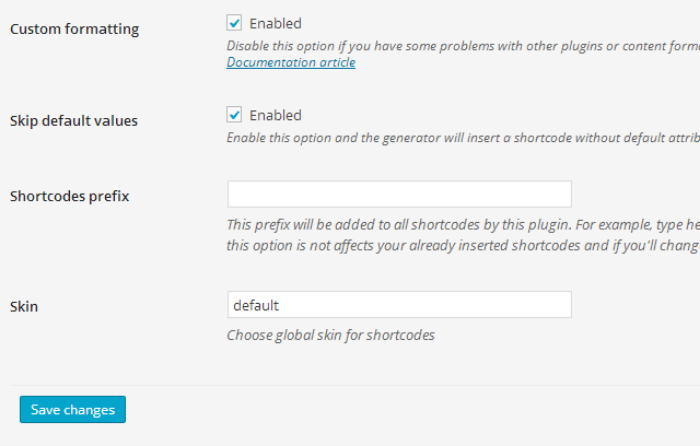
Since the update and production of new versions, the compatibility mode prefixes have been changed from gn to su. For users who own many ShortCodes that still use old prefixes and do not wish to have to change them all, one alternative method would be to change the default prefixes back to your custom ones instead. To do so, ensure that you are able to access the functions.php file of your themes and add in [ update_option(‘su_compatibility_mode_prefix’, ‘gn_’); ]. This will allow you to continue using old prefixes for all the ShortCodes. Make sure to visit plugin settings so that you can also ensure that compatibility mode has been enabled.
If there are certain tabs, tooltips, lightbox, spoiler features that do not work, these can be troubleshooted as well. Users are encouraged to first begin by checking the index.php and footer.php files within their theme. Keep an eye out and ensure that wp_footer template tags are presented in either one of the php files. If the tag is missing, users are required to take steps to ensure that the tags are added properly. If the wp_footer tag is present, they will then have to open javascript error console within their browser. Take a closer look and try to spot any sign of errors.
If the javascript error console displays errors, the likelihood that your website contains broken plugins that interfere with or stop the ShortCodes Ultimate’s javascript code is high. It is essential to find out what plugins are broken by deactivating them one by one and determining whether your website is running normally. Once you have identified the broken plugins, ensure that they are either updated or removed. If you have finished testing all plugins and disabled them but still find that ShortCodes is not working, seek external support through the support forum with links to broken shortcodes examples so that the support team can get to them.
The best way to add advanced functions to any WordPress Theme is by using Shortcodes Ultimate. Without any doubt this is the best Shorcode plugin which enable you to create buttons, tabs, sliders, boxes and many more other options. The plugin is easy to use and give more professional look to your website.
Comments are Closed